Monday, August 02, 2010
Jewelry organization
In the past I used this tiered tray that I created out of some upcycled plates and glasses, but last year I decided I needed it for my booth displays at GLAM and Atomic Holiday Bazaar.
Since then, I've been using a silverware organizer. It's not bad, but my necklaces keep getting tangled.
I'm thinking this nuts and bolts organizer that was featured on Apartment Therapy would be just the ticket. Everything would still be relatively visible and easy to get to, but it would still be tidy.
What about you? Do you have a unique solution for keeping your jewelry organized?
Thursday, July 15, 2010
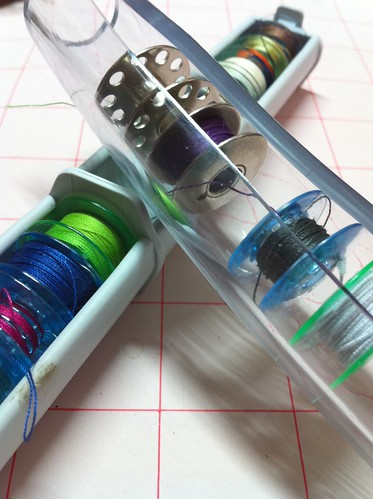
DIY bobbin organizer
| Tidy bobbins |
By using tubing from the hardware store, I was able to create a similar organizer for a fraction of the cost. The only essential tool is a sharp utility knife, though a pipe cutter is helpful for making uniform cuts at the ends. It's also a good idea to work on a self-healing cutting mat or other surface that won't be damaged by the utility knife in case it slips.
Here's how to make your own:
- Head to the plumbing section of the hardware store and purchase some clear vinyl tubing that is marked 1" OD (outer diameter) x 3/4" ID (inner diameter). Usually this tubing costs $1-2 per foot.
- I bought a three-foot section and then we cut it into 6-inch sections. This way I ended up with six compact bobbin organizers that would easily fit in my thread storage box. We used a ratcheting pipe cutter to get an even cut on the end of the tubing, but you can also use a utility knife.
- You'll need to create an opening where you can insert the bobbins. By doing so, you'll also get rid of the ugly writing that comes pre-printed on the tubing. Start by using a permanent marker to draw two guide lines lengthwise down the tubing, about 1/4" apart and on either sides of the text.
- Use a utility knife to cut all the way through the tubing along one of the lines you drew. Be certain that that you have a secure grip on the tubing and that your fingers aren't in the path of the blade. Safety first!
- Next, cut through the tubing along the second line. You'll end up with a long, skinny piece of tubing that you can discard.
- That's it! All you need to do now is insert your bobbins and enjoy a blissful, tanglefree collection of bobbins.
A big thanks goes out to my boyfriend -- he did all the manual labor on this project while I stood next to him making sure that the pictures were framed the way I wanted them to be. Thanks, Babe!
Monday, January 11, 2010
New Year's Resolution: Get Organized!
Aside from losing weight, it seems like the next most common New Year's Resolution is to get organized. Need a little help?
- Stationery box
- Wrapping paper
- Ruler
- Pencil
- Paste
- Waxed paper
- Cut two pieces of wrapping paper—26 11/16” across by 29 3/16” tall for the base, and 15 11/16” across by 18 1/4” tall for the top--either from the same roll or from coordinating rolls. Be sure to use a straight edge, and if necessary a T-square, to keep your cuts square.
- On the larger sheet, draw a line 8 1/2” in from each margin. The center rectangle marks where the box bottom will go. Cut along the lines to remove the square from each corner.
- Apply a thin and even coat of Yes! brand paste to the center square of the larger piece of paper. (Tip: An old credit card works great as an applicator.) Position the box on the glued area and smooth the paper to remove air bubbles.
- Lay down a drop cloth of waxed paper and apply paste to one of the short flaps. Press the paper firmly against the outside of the box, and then fold the remaining paper to the inside of the box. Burnish again to remove air bubbles. Repeat with the remaining flaps, being sure to change out the waxed paper each time. (Note: If you’re worried about exposed corners, cut your shorter flaps 1” wider and glue these wings in place underneath the longer flaps.)
- Now finish the box top. On the remaining sheet, draw lines 2 7/8” from each margin. Cut out the corner sections and follow the steps three and four to adhere the paper to the lid.
Monday, November 26, 2007
Elegant organization
1) Cut two pieces of wrapping paper—26 11/16” across by 29 3/16” tall for the base, and 15 11/16” across by 18 1/4” tall for the top--either from the same roll or from coordinating rolls. Be sure to use a straight edge, and if necessary a T-square, to keep your cuts square.
2) On the larger sheet, draw a line 8 1/2” in from each margin. The center rectangle marks where the box bottom will go. Cut along the lines to remove the square from each corner.
3) Apply a thin and even coat of Yes! brand paste to the center square of the larger piece of paper. (Tip: An old credit card works great as an applicator.) Position the box on the glued area and smooth the paper to remove air bubbles.
4) Lay down a drop cloth of waxed paper and apply paste to one of the short flaps. Press the paper firmly against the outside of the box, and then fold the remaining paper to the inside of the box. Burnish again to remove air bubbles. Repeat with the remaining flaps, being sure to change out the waxed paper each time. (Note: If you’re worried about exposed corners, cut your shorter flaps 1” wider and glue these wings in place underneath the longer flaps.)
5) Now finish the box top. On the remaining sheet, draw lines 2 7/8” from each margin. Cut out the corner sections and follow the steps three and four to adhere the paper to the lid. For a final touch, cut two pieces of paper to fit inside the box top (9 13/16” by 12 3/8”) and bottom (9 9/16” by 12 1/16”). Paste in place.
Thursday, October 18, 2007
Tiered tray
Here's a preview of my November column for The Satellite I figured that with the holidays coming up, it would be nice to do a project that related to entertaining.
I created three tiered stands from an assortment of glassware purchased at a thrift store. I think I paid less than ten bucks for all of the pieces you see here, plus a few I didn't use. The contact adhesive cost maybe four bucks.
- Start with a glass pie dish and glue on a champagne glass (the short and wide kind, not a flute) using a strong contact adhesive. I used one called "Welder." Remember that contact adhesives need to be applied to both surfaces and allowed to dry briefly before the two parts are joined.
- Keep attaching plates and champage glasses until the tray is the height you want. That's all there is to it!