Showing posts with label tutorial. Show all posts

Wednesday, February 08, 2012

Make do and mend

My favorite pair of cargo pants have been sitting in the drawer unworn for months, thanks to an unexpected tear that developed on the left leg. As I was looking through photos, I realized that the last time I wore them might have been on my honeymoon!

Us enjoying our trip to Tybee Island, Georgia

For whatever reason, it's taken me this long to get around to fixing them. It's silly really, because it took me less than thirty minutes once I actually sat down and did it. 

I figure that if I felt overwhelmed with a little mending project, maybe some of you would feel that way too. Well, I'm here to tell you that making your own iron-on patch is simple! All you need is a few basic supplies and less than half an hour.


What you need
+ scissors
+ pinking shears (optional)
+ coordinating fabric
+ double-sided fusible webbing (ex: Pellon 805 Wonder Under)
+ iron and ironing board
+ sleeve board (or a makeshift sleeve board)
+ press cloth

Make the patch
Eye ball the size of the hole and cut a piece of fabric that's at least 1" larger in each direction. Cut a piece of fusible webbing that's a tad smaller, so that you don't end up with adhesive on your ironing board cover. 

Follow the manufacturer's instructions and fuse the webbing to the fabric. For me, this meant putting the bumpy side of the fusible face down on the fabric and then pressing with a hot dry iron for 5-8 seconds. (Sorry -- no picture of this part!)

 Let the piece cool before you handle it, so that the glue can set up. Use your scissors or pinking shears to trim the patch. Pinking the edges will help make sure that your patch doesn't start to unravel after repeated washings. Finally, peel off the paper backing.

Mending and making do

Iron on the patch
Turn your project inside out and head over to the ironing board. If you're fixing pants like I was, you'll need a flat surface that you can slide inside the pant leg. I used a sleeve board, but you could also use a scrap piece of 2x4 wrapped in a towel.

Mending and making do

Next, position the patch over the hole. Spend a little extra time lining up the raw edges of the hole and making sure that any torn threads will lie flat once the patch is in place.

Mending and making do

Use a damp press cloth and a hot iron to fuse the patch, pressing firmly across the entire surface for 10 to 12 seconds.  The press cloth is just a piece of muslin that I wet under the faucet and then wrung out so that it was just damp. You can see that I chose to pin the bottom half of the patch and fuse the top half first, since I wanted to make sure that the patch wouldn't shift as I was fusing.

Mending and making do

Once the top half of the patch was fused, I removed the pin and fused the bottom half. Don't forget to use a section of the press cloth that's still damp.

Mending and making do

And voila! Here's what the finished patch looks like on the inside.

Mending and making do

And here's a shot of me wearing the newly mended pants. I debated about whether or not to reinforce the patch with some topstitching, but I decided that I'd wash the pants a few times and see how it holds up. I can always go back later and add reinforcement.

Mending and making do

Thursday, February 03, 2011

Heartfelt Fortune Cookies

Felted fortune cookies
Next week I'm teaching a free Valentine's themed craft workshop at my local library. We'll be making these darling fortune cookies out of felted sweaters.

Shhh... don't tell, but I'm going to give you the inside scoop on how to make them, just in case you can't be there!

Martha has a similar tutorial, but I'm partial to my method because it provides almost instant gratification with no drying time. Seriously. These things take no more than five minutes to make, but they're oh so cute.

You can download my written tutorial here, or you can just check out this video. (You can view it larger by heading over to YouTube)


Once you're done making your cookies, don't forget to stop by your local Chinese restaurant for a take-out box to put them in. And if you do make your own, I'd love to hear about it, especially if you have a sweet fortune that you wrote yourself!

Wednesday, July 28, 2010

How to truss a chicken, MacGyver style

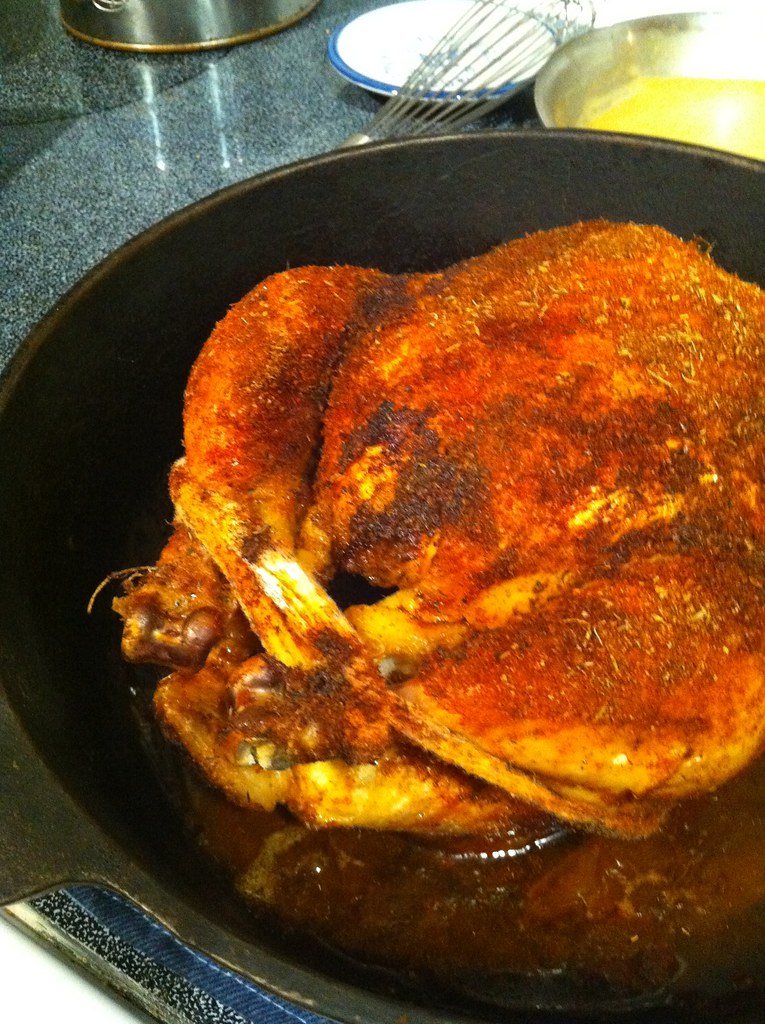
Roasted paprika chicken
Every year, I like to add at least one new cooking technique to my repertoire. A few years ago I attempted my first gumbo and have been perfecting the art of making roux ever since. Last year, I went on a deep frying kick. I tried my hand at frying a whole chicken from scratch, and made homemade oyster po-boys.

Last week I decided to roast a whole chicken. I hadn't really planned on it. But when I went grocery shopping, I somehow ended up with a whole chicken in my shopping cart. Mainly, it was because I was disgusted that chicken breasts were something like $7 per pound, while whole chickens were only $2 or so per pound.

Once I got the bird home, I looked to the trusty interwebs for help. I remembered seeing a clip of Jacques Pepin trussing and roasting a whole chicken on an episode of Anthony Bourdain: No Reservations. I couldn't find that exact clip, but I did find this one. And then I found this recipe for roasted paprika chicken, courtesy of Martha Stewart. (Bonus: It calls for a cast-iron skillet!)

But there was one problem. I didn't have any cotton butcher's twine for the trussing. So what did I use? I'll give you a hint--it's normally found in the first aid cabinet.

That's right! I used a roll of cotton gauze. Not bad for a little Martha meets MacGyver, eh? I can't take full credit though, since my boyfriend's the one who came up with the idea.

As for the chicken, it turned out delicious and was super easy. I even whipped up some homemade stock using the giblets and then made gravy from scratch. Yum! We had enough chicken for dinner that night, lunch the next day, and a few additional nibbles. Not bad considering that the whole chicken cost less than I would've spent on two chicken breasts.

Note: If you don't like the idea of the chicken sitting in its own grease while it cooks, my friend Jen of Scurrilous Tosh offers this tip--just put a few stalks of celery or carrot under the bird to act as a roasting rack. Thanks, Jen!

Thursday, July 15, 2010

DIY bobbin organizer

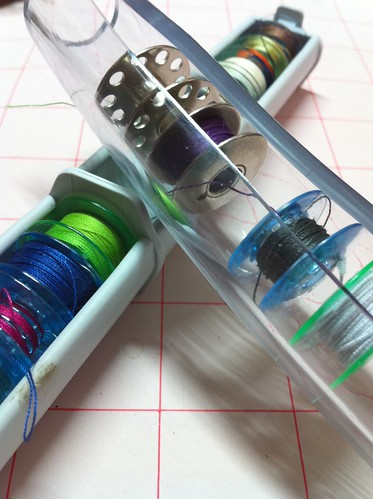
Tidy bobbins
Don't you just hate it when your sewing machine bobbins end up in a tangled mess? I have a bobbin organizer that I love (the grey one in the photo), but I felt like it was a little pricey. Rather than buying more, I decided to craft my own.

By using tubing from the hardware store, I was able to create a similar organizer for a fraction of the cost. The only essential tool is a sharp utility knife, though a pipe cutter is helpful for making uniform cuts at the ends. It's also a good idea to work on a self-healing cutting mat or other surface that won't be damaged by the utility knife in case it slips.

Here's how to make your own:

  1. Head to the plumbing section of the hardware store and purchase some clear vinyl tubing that is marked 1" OD (outer diameter) x 3/4" ID (inner diameter). Usually this tubing costs $1-2 per foot. DIY bobbin organizer
  2. I bought a three-foot section and then we cut it into 6-inch sections. This way I ended up with six compact bobbin organizers that would easily fit in my thread storage box. We used a ratcheting pipe cutter to get an even cut on the end of the tubing, but you can also use a utility knife. DIY bobbin organizerDIY bobbin organizer
  3. You'll need to create an opening where you can insert the bobbins. By doing so, you'll also get rid of the ugly writing that comes pre-printed on the tubing. Start by using a permanent marker to draw two guide lines lengthwise down the tubing, about 1/4" apart and on either sides of the text.  DIY bobbin organizer
  4. Use a utility knife to cut all the way through the tubing along one of the lines you drew. Be certain that that you have a secure grip on the tubing and that your fingers aren't in the path of the blade. Safety first! DIY bobbin organizer
  5. Next, cut through the tubing along the second line. You'll end up with a long, skinny piece of tubing that you can discard. DIY bobbin organizer
  6. That's it! All you need to do now is insert your bobbins and enjoy a blissful, tanglefree collection of bobbins.DIY bobbin organizer
One of the best things about this project is that it will work with any size bobbin. The sidewalls of this particular tubing seem to have just the right amount of give. And because the tubing is transparent, it's easy to see what color bobbins you already have wound. But best of all, you can put an end to those annoying bird nests of jumbled bobbins rattling around in your sewing box.

DIY bobbin organizer

A big thanks goes out to my boyfriend -- he did all the manual labor on this project while I stood next to him making sure that the pictures were framed the way I wanted them to be. Thanks, Babe!

Tuesday, July 13, 2010

Retooled table

I just discovered a new site called The CSI Project: create...show...inspire. Every week they feature a challenge to get your creative juices flowing. This week's challenge is Yard Sale Makeovers, so naturally I felt like I had to post a makeover of my own!

retooled table

This is a boring old end table that I bought at a flea market and transformed into the colorful table you see here. I had always wanted to create a table that incorporated a game board. Amazingly, the vintage Chinese checkers board that I had was a perfect fit on the top of the table! I decided not to attach the board permanently to the table, because I wanted to have the option of flipping it over and enjoying both sides of the board. I did have a piece of glass cut to fit the inside of the wooden frame so that the board would be protected.

retooled table

And can I just tell you how much I love the way the finish turned out? It looks a lot like milk paint, even though I used regular acrylic housepaint. I put on a base coat of yellow followed by a coat of red, with a little bit of sanding to grunge it up. I think the magic happened when I rubbed some brown and black shoepolish over the whole thing to give it that aged look. Vintage perfection!

I don't have any before photos of the table, but trust me when I say that the table was pretty blah. A previous owner had stripped it completely, and it had obviously been sitting around naked for awhile at the flea market (never a proper thing to do) and had turned a dull gray as the wood cracked and dried out.

If you're thinking that you've got a great yard sale transformation to share, be stop by The CSI Project website before noon on Thursday to learn how YOU can join in the fun!

Visit thecsiproject.com

Sunday, May 02, 2010

Executive chef apron tutorial

The executive chef apron that I sent off last July is now appearing in the Summer 2010 issue of Altered Couture magazine. Here are the details on how to make your own.

  1. Start with an old men's dress shirt, either from a thrift store or from the back of the closet. Make sure it is clean and freshly pressed. Also choose two neckties that coordinate with the shirt, which you'll use later as the waistband and apron strings.
  2. Slip the shirt onto a dress form and begin shaping the apron bodice. Use a dissappearing ink marker to outline the edge of the bodice and back yoke. If you'd like a tailored fit, also mark two bust darts. Also draw a line to represent where you would like the waistline to fall. Cut out the bodice, leaving a ¼-inch seam allowance along the sides and back yoke and a ½-inch seam allowance along the waist.
  3. Sew the bust darts first. Then use bias tape to finish the raw edges along the sides and back of the bodice. Stay-stitch the waistband using a 1/4-inch seam allowance.
  4. Take the bottom half of the original shirt and cut it open along the center back. Run a long basting stitch along the top edge of this piece and gather it to form the apron skirt. Top-stitch to secure the gathers. Then use double-fold bias tape to attach the bodice to the skirt.
  5. Whipstitch the two neckties together at their widest points and hand then sew them along the waistline of the apron. Tuck a monogrammed handkerchief in the boday and you're set!
Now I'm off for a vacation in the Pacific Northwest. I'm excited because we'll be visiting a number of beautiful gardens, but I'm also going to carve out some time for some crafty adventures. Should be fun!

Monday, February 01, 2010

Easy fingerless gloves tutorial

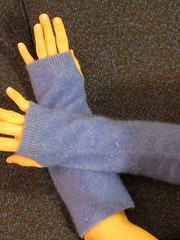
As I said last week, I'm a big fan of fingerless gloves, sometimes called wrist warmers. They keep my hands nice and toasty even when it's freezing in my office.

There are a ton of great fingerless gloves for sale on Etsy, but I chose to make my own. I decide against knitting a pair since I'm a poor knitter -- I drop so many stitches it always looks like moths have already eaten holes in my pieces. Instead, opted to make a pair of fingerless gloves out of -- you guessed it -- an old wool sweater.

Old wool sweaters are a great raw material for crafters who are interested in making fun and unique accessories for themselves and their homes. Once felted, wool sweaters can be cut without the risk of unraveling.

(P.S. Sorry for the wonky color in the photos. Apparently the auto white balance on my camera wasn't cooperating.)

What you need:
  • wool or wool-blend sweater
  • washing machine
  • laundry detergent
  • scissors
What to do:
  1. Stop by your favorite thrift store and pick up a sweater. You'll have best results with sweaters that are 100% natural fibers—100% wool, 100% merino, 100% cashmere, or blends of wool and other natural fibers like angora or alpaca. Sweaters that have nylon in them can pill during felting, although they don't always. Do not use sweaters that say they are machine washable. The yarn in these sweaters has been treated so that they can be machine washed, but the treatment prevents them from being feltable.Wool blend sweaterSweater, before washing
  2. Fill your machine with enough hot water and leave room for the sweater to agitate. Add laundry detergent-—a little less than the recommended amount.—and an old towel or pair of jeans to help with the agitation. The hot water and detergent allow the kinky fibers of the wool to rub together and eventually interlock. Technically, this process is called fulling but many crafters use the term felting instead. Dry the sweaters in the dryer on medium or high.Wash the sweaterSweater, after washing
  3. Cut the sleeves off of the sweater.Cut off the sleeves
  4. Try on the cuffs and use a pin to mark where you would like the thumb holes to be. You don't have to cut thumb holes, but I've found that the gloves stay in place better with them. IMG_3781
  5. Cut a dime-sized opening for each thumb hole. The openings will stretch a little as you wear the gloves, and you can always enlarge the openings later if you need to. Cut the thumb holes
  6. That's all! Now you can type to your heart's content without your fingers going numb.
Don't forget -- this is the first regular week of projects over at So You Think You're Crafty. I feel like I put together a project that really represents who I am as a crafter. I can't tell you which project is mine, but you might be able to guess. So please, stop by and vote!

Monday, January 25, 2010

Record journal tutorial

Record Journal
Record journal
Originally uploaded by sassycrafter
As promised, here's the tutorial for the record album journal that I made for the WGOT benefit concert. Remember, you can always click on the photos if you want to see larger images.

What you need:
+ Two old record album covers (save the records and make record bowls)
+ Craft knife
+ Paste
+ Old credit card
+ Straight edge
+ Aluminum duct tape
+ Scrap paper
+ Permanent marker
+ Japanese screw punch
+ Scrapbook paper stack
+ Needle
+ Ribbon

What to do:
1. Pick out two album covers. Cut open three sides of each album with the craft knife. Using an old credit card, spread paste evenly along the inside of each album cover. Then put a few heavy books on top until the paste dries.
IMG_3733
IMG_3735
IMG_3739

2. Use a straight edge and a craft knife to cut the front cover into two pieces, with the smaller piece being 1 inch wide. Then use two pieces of aluminum duct tape (one front, one back) to join the two pieces into a hinged cover.
IMG_3743
IMG_3746

3. Use a piece of scrap paper to plot the layout of the holes, and then mark the holes on the cover using a marker. Drill the holes using the screw punch. Repeat with the back cover.
IMG_3750

4. Use the template and the screw punch to drill through the scrapbook paper. I recommend using just 1/3 or 1/2 of the stack--otherwise you'll never get all the layers drilled. The gummed edge should be sufficient to hold all of the pages together while you're drilling.
IMG_3752
IMG_3753

5. Assemble the top cover, pages, and bottom cover and hold in place with two binder clips. Then thread the eye of a needle with ribbon and then lace through the holes. When finished, tie off.
IMG_3756
IMG_3758

6. That's all! Start jotting down your creative ideas in this unique journal.
IMG_3760
IMG_3763

Sunday, January 17, 2010

Suitcase coffee table


Suitcase table
Originally uploaded by sassycrafter
Anyone can stack a few suitcases on top of each other to create an end table, but why not take a fresh approach that's both modern and utilitarian. By incorporating casters, you'll have a coffee table that can glide out of the way when you vacuum or can slide closer when you’re noshing on the couch. And hey, who couldn’t use the extra storage hidden inside the coffee table?

What you need:
  • Suitcase
  • Casters**
  • Wood scraps
  • Spray paint
  • Level
  • Heavy duty adhesive
  • Drill or screwdriver
  • Screws and washers

What to do:
  1. Thrift stores often have lots of vintage suitcases. For this project, you’ll want one that’s hard-sided, large and boxy. You’ve seen ‘em – they’re the ones that you’d never be able to lift if they were packed full of stuff. If you can find a case that’s completely rectangular, you’re in great shape. Otherwise, you’ll have to make a few adjustments using the wood scraps.
  2. Do a dry fit with the wood scraps, which serve a dual purpose of reinforcing the suitcase and making it horizontally level. I ended up using scraps from a 2x4 and a 1x4, but you’ll have to see what your particular suitcase needs. Ultimately, the blocks only need be 4” to 6” long to provide enough space to mount the casters.
  3. Spray paint the scraps silver to match the casters.
  4. Use screws and washers to attach the casters to the wood scraps. Be sure to select screws that won’t pierce through the back side of the wood.
  5. Using a construction-type adhesive like Liquid Nails, glue the wood-caster combo to the bottom of the suitcase about 1.5” in from the sides. (I recommend glue, rather than screws, for attaching the wood-caster combo to the suitcase -- most old suitcases are made of some funky yet flimsy particleboard and the screws can compromise the strength of the particleboard.)

**Note: I suggest using casters that are at least 4” in diameter in order to get that modern, industrial-chic look. You can buy large casters at your local home store, but they’re usually pretty pricey. I recommend trolling the web instead (thank you eBay!). You’ll want to search for swivel caseters, keeping in mind that at least two should have brakes. That way you won’t constantly be chasing your new coffee table across the living room.

Monday, January 11, 2010

New Year's Resolution: Get Organized!


Aside from losing weight, it seems like the next most common New Year's Resolution is to get organized. Need a little help?

The current trend is to buy coordinated boxes to hide the clutter, but these can be expensive and may not come in colors you like. This project uses a common office waste product—boxes that hold pre-printed letterhead—to help you bring elegant and affordable order to your home.

These instructions include measurements for a standard-sized stationery box. If you choose a different box, you’ll need to measure its dimensions and do the math yourself.

What you need:
  • Stationery box
  • Wrapping paper
  • Ruler
  • Pencil
  • Paste
  • Waxed paper

What to do:
  1. Cut two pieces of wrapping paper—26 11/16” across by 29 3/16” tall for the base, and 15 11/16” across by 18 1/4” tall for the top--either from the same roll or from coordinating rolls. Be sure to use a straight edge, and if necessary a T-square, to keep your cuts square.
  2. On the larger sheet, draw a line 8 1/2” in from each margin. The center rectangle marks where the box bottom will go. Cut along the lines to remove the square from each corner.
  3. Apply a thin and even coat of Yes! brand paste to the center square of the larger piece of paper. (Tip: An old credit card works great as an applicator.) Position the box on the glued area and smooth the paper to remove air bubbles.
  4. Lay down a drop cloth of waxed paper and apply paste to one of the short flaps. Press the paper firmly against the outside of the box, and then fold the remaining paper to the inside of the box. Burnish again to remove air bubbles. Repeat with the remaining flaps, being sure to change out the waxed paper each time. (Note: If you’re worried about exposed corners, cut your shorter flaps 1” wider and glue these wings in place underneath the longer flaps.)
  5. Now finish the box top. On the remaining sheet, draw lines 2 7/8” from each margin. Cut out the corner sections and follow the steps three and four to adhere the paper to the lid.
(It's no secret that I love recycling, and this post is no exception. I originally posted it in November 2007, but I wanted to share it again since I felt it was especially timely.)

Friday, December 04, 2009

5-minute Anthroplogie inspired necklace

5-minute Anthroplogie inspired necklace
It's no secret that I love pretty much everything that Anthropologie comes up with. Earlier this fall, I got a promotional email that featured a beautiful necklace that caught my eye.

I decided that I could probably get the same look by repurposing a necklace that has been collecting dust in my jewelry box. So this morning before work that's exactly what I did. Yes, I'm an impulsive crafter. But hey, I was still on time for work and I had the perfect necklace to complete my outfit.

If you want to get the same look, here's what to do. Sorry I don't have step-by-step photos like I usually include in my tutorials, but I didn't want to be late to work!

1) Start with a three-strand, graduated, choker-style necklace.

2) Use jewelry pliers to remove the original clasp parts from both ends of the necklace.

3) Add a jump ring to each end of the necklace.

4) Thread a piece of vintage blanket binding through one of the jump rings, fold the ends under, and secure with Fabri-Tac glue. Repeat with the other end.

5) Pick a piece of vintage sewing trim that complements the look of your necklace and tie it onto one of the jump rings. Then loop it around the blanket binding several times and tie it off on the other jump ring.

6) Since I like assymetrical looks, I tied an additional length of trim to one of the jump rings and then pinned a vintage brooch just above the jump ring.

So, here's a shot of the original inspiration piece. Not bad, eh? Especially for just five minutes and $0 invested. I love repurposing.

Anthropologie inspiration

(Please forgive the grayness in my own photo. I snapped it with my iPhone, which doesn't always take the best pictures. Plus, it was really overcast today.)

Thursday, November 12, 2009

So it's your first craft show...

The holiday craft show season is upon us! While some crafters are seasoned veterans on the craft show circuit, others are gearing up for their first shows. The picture on the right is from my own craft show debut. I've learned a lot since then so I figured it might be nice to share some tips. You can also find a great post full of craft show tips from the folks at Etsy.com.

1. Bring a tool kit
Okay, so you may not need a screwdriver or hammer, but it does help to pack a few tools of the trade. My tool kit is a vintage train case that includes receipt books, pens, Sharpies, scissors, safety pins, a glue stick, extra price tags, clothespins (great for attaching informational signs to products), business cards, and a bank to make change from.

Some people like to wear an apron that has pockets and stash their cash there. The OCD part of me can't stand all of those loose bills getting jumbled up. Instead, I use a coupon organizer to keep all of my ones, fives, tens, and twenties organized so that I can make change quickly. Speaking of which, be sure to come prepared with plenty of $1 and $5 bills, since people typically arrive with a stack of $20 bills fresh from the ATM.

You'll also need to bring some sort of bags for your happy customers to put their purchases in. I use plain brown bags with handles and then tie on a few pieces of vintage ricrac or hem tape in advance to give them a personal touch. And of course, always include a business card with every purchase. That way if people like your products, they'll know how to contact you for more. If you have an Etsy shop, consider adding a coupon that offers a percentage off of any sale within the next month. This can be a great way to drive new people to your Etsy site.

2. Sell the sizzle
You'll no doubt be surrounded by other talented crafters, so it's important to make your table/booth stand out. The goal is to make people want to cross a crowded aisle just so that they can scope out the amazing things that might be tucked into your booth.

Christie Adams, jewelry designer extraordinaire!
I can still remember the first craft show booth that blew me away. It belonged to Christie Dickens, aka "Evon's Muse." You may recall that I blogged about her back in April. Christie incorporates vintage linens, books, and other items to give her booth a comfortable feel, making it seem like you just stepped into some funky granny's living room. You don't have to use vintage items, but try to use fabric and other elements to give your booth its own cohesive feel.

Christie also elevates some of her items using old wooden crates. This is great because people appreciate not having to stoop over to look at items that are laid flat on a table. And again, giving your booth some height can help it stand out from the others.

Make sure you bring something to cover your table(s) with. I typically spread a cute vintage table cloth over a larger, basic white tablecloth. The vintage cloth adds personality while the white cloth allows me to hide extra junk under the table. Bed sheets work great, too.

And before you leave the house, do a test run. I cannot stress this enough. Try setting up your stuff on your dining room table. Play with the placement of things. In some cases you may not have much time to set up your booth before shoppers arrive, and if you've practiced at home then you'll be able to set up your booth lickety-split and still have it look fabulous.

For more inspiration, visit the SHOW ME YOUR BOOTHS group on the photo sharing site Flickr.com.

3. Think big (and small)
It's a good strategy to have items available at different price points. If you're a mixed media artist whose specialty is large-scale collages, chances are they may be beyond the budget for some shoppers. An easy way to create lower-ticket items would be to scan or photograph the collages and print them onto greeting cards, magnets, or journal covers. Less expensive items also provide shoppers with a comfortable entry point to your work. They may buy something small this year, decide they like it, and then buy a more substantial piece down the road.

4. Tell your story
As a general rule, people who come to craft shows do so because they prefer to buy things that are made with love by real-life people. They often enjoy hearing about your creative process and inspirations. For example, I make most of my items out of recycled materials and typically use small signs to tell the story behind the final product. I love seeing the look on a shopper's face when he or she learns that the jewelry box they're looking at was made from an old waffle iron. I have found that these little signs can help shift people from window shoppers to true customers.

5. Make friends
This is important for several reasons. (1) Your booth neighbor might be willing to keep an eye on your booth when you head to the loo, which is bound to happen at some point in the day. (2) Crafters like selling their wares, but they also love checking out what other crafters make. This means that your fellow crafters are also your potential customers. (3) The connections you build with other crafters can lead to future business opportunities. As a result of conversations I've had with fellow crafters, I've booked workshops and found new stores that are interested in carrying my items.


So now that you've learned the inside secrets, what are you waiting for? Get on out there! And above all remember to have fun.

LinkWithin

Blog Widget by LinkWithin