Showing posts with label recycled. Show all posts

Friday, March 25, 2011

Fiber art

Tonight my hubby and I stopped by Satchel's, our favorite pizza joint, to pick up a pie for dinner. We got there before the pizza was ready so we headed to Lightnin' Salvage, a curious amalgamation of music hall, five and dime, and junk museum. If you're ever in Gainesville, the whole place is definitely worth a visit. Satchel even installed a bocce court in the back forty.

Lightnin' Salvage always has a few interesting collections on display and tonight was no exception. Check out this unique fiber art piece.

Fiber art (aka dryer lint)

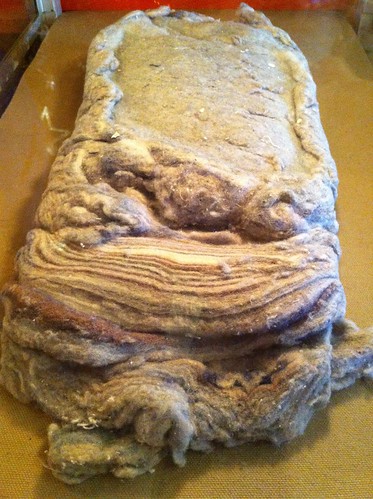
Can you tell what it's made of? Here's another look.

Fiber art (aka dryer lint)

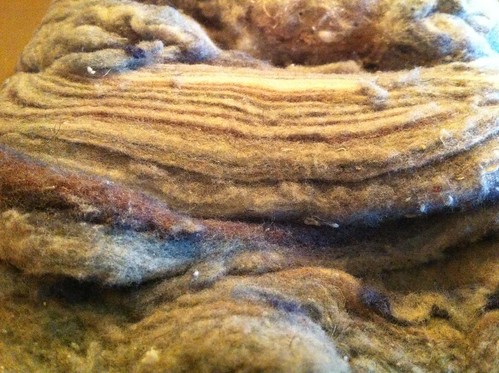
Did you guess it? It's an entire mass of dryer lint! Too crazy! Here's the crazy explanation behind how it ended up on display at Lightnin' Salvage (click on the photo to see it bigger).

Explanation of fiber art (aka dryer lint)

This 3D lint sculpture reminded me of the crazy amount of lint that piles up in my own dryer vent when I'm felting sweaters, though it's nothing compared to this.

And now that I'm rattling on about dryer lint, I'm reminded of an artist I once saw on an HGTV show who made "paintings" out of dryer lint. Seriously. Did anyone else see that episode on "Crafters Coast to Coast" aka "That's Clever"?

Image: HGTV.com
At any rate, I thought this might make y'all smile. Hope you all have fun and creative weekends!

Friday, September 04, 2009

Sing!

I couldn't resist "singing" to you about how well the workshop went last week. We had a good crowd, including a few kids (always fun!) and a gal who attended the felted sweaters workshop and came back for more.

Everyone's bottlecaps turned out amazing. It was hard for me to give them back and not want to keep them for myself, especially this cute little birdie.

At any rate, I wanted to show them off to you. It's always so much fun to put the same pile of basic materials in front of people and see the unique things they each come up with.

Lauren's bottle caps

Resin bottlecap pendants


Luna and Inti's bottle caps

Resin bottlecap pendants


Nicole's bottle caps (your name was Nicole, right?)

Resin bottlecap pendants

I'll be offering new workshops through the Alachua County Library District in the spring. In the meantime, check out my sewing workshops through the UF Leisure Course Program.

Monday, July 06, 2009

Summer craft workshops in Gainesville

Join me for a second round of free craft workshops with the Alachua County Library District!

This time we'll work with recycled bottle caps and resin to create 3D mini-collages that can be used as necklaces, magnets, keychains, pet ID tags, zipper pulls, wine glass charms, or whatever else you can think of.

First we'll create mini-collages in the bottle caps using paper, foil, glitter, yarn, and small 3D elements. Then we'll fill the bottle caps with clear resin to seal the collages and add a dimensional effect.

Finished resin bottlecap pendants

I'll provide materials, though it would be helpful for you to bring a pair of scissors and any favorite collage papers or small charms, beads, or 3D elements.

You must be able to return to the library a few days after the workshop to pick up your finished pieces, since the resin needs several days to cure.

Hawthorne Branch
Saturday, July 11
2-4 p.m.
more details

Micanopy Branch
Sunday, July 26
2-4 p.m.
more details

Headquarters Branch
Tuesday, August 25
6-8 p.m
more details

Finished resin bottlecap pendants

Friday, March 20, 2009

Felted calendar cover


Felted calendar cover
Originally uploaded by sassycrafter
Even with the ongoing surge of technology, paper calendars remain the tried and true way of keeping track of what's going on in life. In this era of ever-increasing personalization, why not create a fun cover to protect your paper planner throughout the year? You can also use the same technique to cover journals or other favorite books.

What you need:

Wool sweater
Washing machine
Scissors
Felt scrap
Pins
Ruler
Needle
Thread
Ribbon

What to do:

1) Find a wool or wool-blend sweater and felt it by machine washing it with hot water and a small amount of detergent. Include an old pair of jeans or a towel to help the felting process. Let dry, either at room temperature or in a dryer set to medium or high.

2) Open the calendar and measure its width and height, and then cut an identically sized rectangle from the felt. Also cut two panels that are the same height as the calendar and 2 1/2 inches wide. These will create the flaps to hold the calendar's front and back covers.

3) Create an apple applique (say that ten times fast!) from a scrap of contrasting felt and sew this to the front cover, either by hand or with a machine. Next, pin the panels to the cover and sew in place on three sides with a scant 1/4" seam allowance.

4) Cut a length of ribbon to serve as a page holder and sew this to the top center of the cover's spine.

5) Now insert your calendar and get organized!

Would you like to have crafty updates coming straight to your inbox? Subscribe via the box on the side of this page.

This tutorial originally appeared in the February issue of The Satellite. At this point, it looks like it will be the last tutorial to appear in that publication, since it is no longer printing. I'm working on finding another print publication that can run my columns.

Sunday, November 23, 2008

Christmas Countdown

This time of year, kids can hardly wait for the man in the red suit to bring toys to all good girls and boys. One way to help kids count the days is with an Advent calendar. But why settle for an old-fashioned paper one? Make a 3-D sculpture that can hold a small surprise for every day between now and Christmas Eve!

What you need:

Tins
Paper
Pencil
Scissors
Particle board
Jigsaw
Sandpaper
Spray paint
Epoxy
Numbers

What to do:

1) Dig out the candy tins that you've been collecting in your junk drawer (c'mon, you know you can't bear to throw those cute Altoids tins). Arrange 24 tins in a tree shape on a large piece of paper. Trace around the tree and around each tin. Cut out the tree pattern and use then transfer it onto the particle board. (Note: I actually did the layout directly on the MDF, but it's easier in the long run to create a pattern.)

Altoids Advent calendar -- step 1

2) Cut out the tree using the jigsaw, then sand rough edges and wipe off residual dust. Spray paint the tree and the tins, adding extra coats if necessary.

Altoids Advent calendar -- step 2

Altoids Advent calendar -- step 3

3) Figure out which tin goes where by referring to your pattern, and then attach the tins to the tree with two-part epoxy. Apply number decals to the tins, add some candy or other surprises, and then count the days until Santa arrives!

Altoids Advent calendar -- step 4

Altoids Advent calendar (detail)

Don't miss unique gifts like this for sale at Gainesville's first Handmade Holiday Bazaar on December 6th at Loop de Loop (205 NE 16th Ave.)

This column will appear in the December issue of The Satellite, North Central Florida's premiere alt-monthly.

LinkWithin

Blog Widget by LinkWithin