
 |
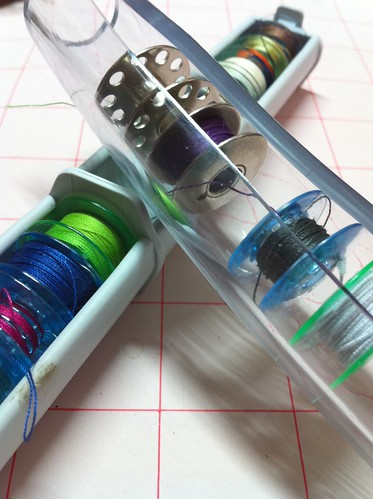
| Tidy bobbins |
By using tubing from the hardware store, I was able to create a similar organizer for a fraction of the cost. The only essential tool is a sharp utility knife, though a pipe cutter is helpful for making uniform cuts at the ends. It's also a good idea to work on a self-healing cutting mat or other surface that won't be damaged by the utility knife in case it slips.
Here's how to make your own:
- Head to the plumbing section of the hardware store and purchase some clear vinyl tubing that is marked 1" OD (outer diameter) x 3/4" ID (inner diameter). Usually this tubing costs $1-2 per foot.
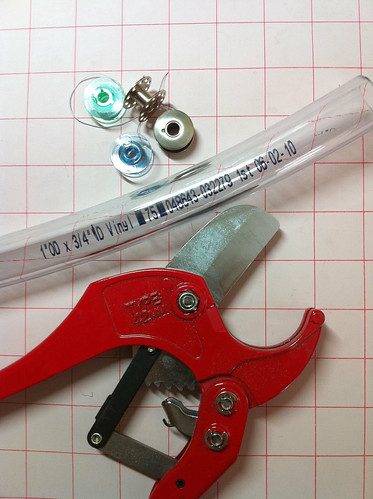
- I bought a three-foot section and then we cut it into 6-inch sections. This way I ended up with six compact bobbin organizers that would easily fit in my thread storage box. We used a ratcheting pipe cutter to get an even cut on the end of the tubing, but you can also use a utility knife.

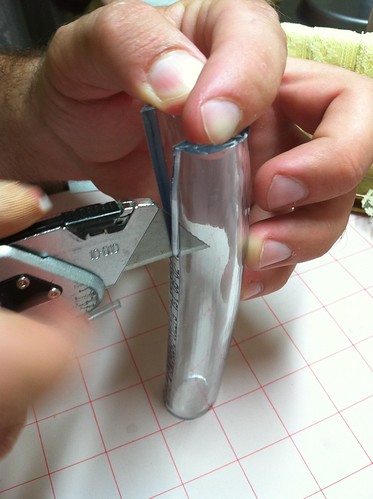
- You'll need to create an opening where you can insert the bobbins. By doing so, you'll also get rid of the ugly writing that comes pre-printed on the tubing. Start by using a permanent marker to draw two guide lines lengthwise down the tubing, about 1/4" apart and on either sides of the text.
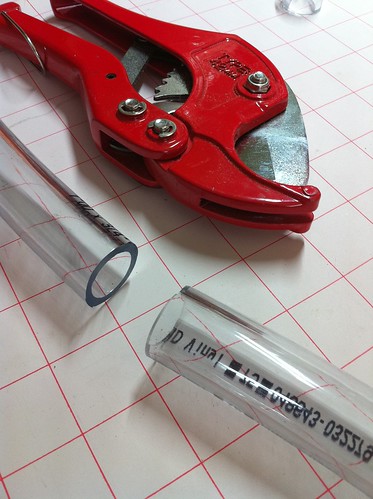
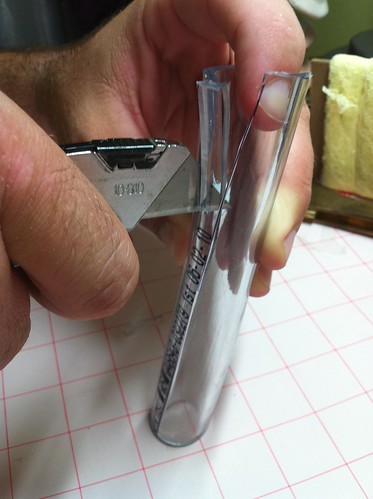
- Use a utility knife to cut all the way through the tubing along one of the lines you drew. Be certain that that you have a secure grip on the tubing and that your fingers aren't in the path of the blade. Safety first!
- Next, cut through the tubing along the second line. You'll end up with a long, skinny piece of tubing that you can discard.
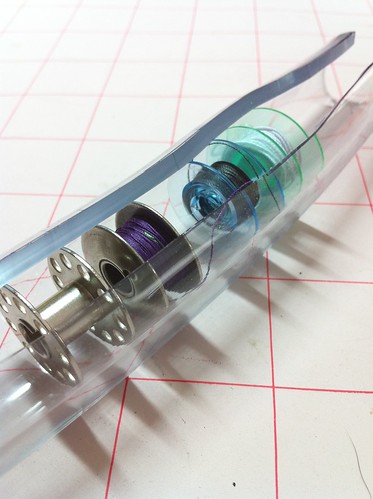
- That's it! All you need to do now is insert your bobbins and enjoy a blissful, tanglefree collection of bobbins.

A big thanks goes out to my boyfriend -- he did all the manual labor on this project while I stood next to him making sure that the pictures were framed the way I wanted them to be. Thanks, Babe!
36 comments:
OK. This is brilliant. I am making me one this weekend! Thanks so much!
Fabulous idea, Kim!! I submitted your post to Craft Gossip! Once they post it you will get a lot of traffic, I'm sure! :o)
Hashi: Wonderful! I hope it helps you conquer your bobbins!
Crafty Gemini: Great idea about Craft Gossip. Thanks!
This is SO COOL!! Your friend Vanessa (Crafty Gemini) sent me the link to your project. I've posted about it over at Craft Gossip:
http://sewing.craftgossip.com/tutorial-make-a-bobbin-organizer-to-keep-the-threads-tangle-free/2010/07/16/
--Anne
Thanks, Anne! I'm tickled pink to have it featured on Craft Gossip!
Found you via Craft Gossip. I love this idea! Well done!
thanks for this great idea!!! my bobbins are a mess, i can't wait to make one!!!
Excellent idea plumbing sectiom here I come!!
Great.. mess with bobbins-no more!
Very cleverly done and great step by step instructions. I sew a lot and this is an idea I plan to implement very soon! Thank you! Pam @ Sallygoodin
what a brillinat idea!
off to HD to buy some tubing
Absolutely genius. Thanks so much for sharing. I hate all the thread hanging all over the place. Now I will have beautiful neat bobbins.
Thanks
Sandi
That is just the niftiest idea!
I am really ... shall we say "stingy" with my thread, so I don't wind my bobbins with any extra if I can help it. (Of course, that means I typically run out with about six inches left to sew.) That quirk helps me to not have the jumbled bobbins problem, but this is an excellent solution! I linked on my weekly roundup - thanks for sharing!
OMG! Too perfect! Can't wait to make my own set!
awesome! i have a bunch of this exact tubing leftover from making hula hoops last year (and the tube-cutting thing).
my bobbins are out of control
I had my DH help me make some of these today... thanks for the great idea!!
I love this!
Made some, and blogged about it here:
http://allthingsfee.blogspot.com/2010/09/bobbin-storage-sew-simple.html
Felicia, I love the pinked edge on your version!
SWEET! I have the tubing and just want to add some adhesive magnetic tape to the outside. It will keep metal bobbins more securely inside the tubing and I can attach it to the metal support of my sewing table with the outside of the magnet tape. Easy access and secure.
Thank you for this!
Creative genius! Thanks for the detailed tutorial!
Very nice idea! I came across an article a couple years ago that had a super easy and cheap way to hold bobbins that you might like too though. All you do is pick up a box of binding combs like this one: http://www.officemax.com/catalog/images/209x186/04120962i_01.jpg
They work perfectly, the straps hold the thread down and they make them in clear plastic too. I usually punch a hole in the top and hang the comb up by my machine.
Office supply stores sell them in large quantities (I give the extras to crafty friends). It's such a simple thing that works so perfectly =)
Jenna, I like the way you think! The binder idea is even simpler to put into action. I have a few of those hanging around, too. I'll have to try it!
Thanks for this awesome idea:) I found you through the quilting Gallery site ( love her)
I'll be back:)
Valerie
http://www.PastimesOnline.ca
What a great idea for a bobbin holder! I am going to my local hardwere store tomorrow!!! Thanks for sharing!
Lisa
Wow...thanks! I need a larger bobbin holder for my long arm machine, and you either can't find them or they cost a fortune! I'm just gonna buy a wider tube. Thanks again!
Made 1 dozen for a group of quilters as a small thank you for our friendships. I'll be giving them to the ladies this week; responses to follow. Flamingo Red
Fantastic idea, I too am going to make one this weekend!
Does anyone have a tip for keeping track of which bobbin matches with thread! I seem to have a number of whites and neutrals and don't always know which bobbin goes with which thread. I suppose being neutrals it doesn't really matter!
Hi Cheryl -- thanks for stopping by! You could try using a thick chenille pipe cleaner to store the spool and coordinating bobbin together. Just stick the pipe cleaner into the center of the spool and then stick the bobbin on top, trimming as necessary. Voila!
I have been racking my brain trying to figure out what flexible type of hardware store item would do this job. Hate the hanging threads. Thanks for doing all the thinking work for me ... now if I can make my own without cutting off a digit ...
Domestic Intuition: My pleasure! Thanks so much for stopping by. And P.S. -- I love your blog name!
Thanks Kim for sharing such a brilliant idea. Your idea has also helped me solve the problem of how to store the small thread spools because the larger size of plastic tubing is perfect to store them.
Omg this is super awesome! I was thinking of making something similar to this myself but it's amazing to find a tutorial online! Keep up with the good work! x
Mimi
www.mimiscraftyworld.blogspot.com
Thank you for posting the perfect solution to my problem of being able to take all the different colors of thread I need for my EPP work without taking up so much space in my work box.
Thank you posting such a great solution to a problem I was trying to solve. I am using a tool kit to take along my English Paper Piecing supplies and the spools of thread were taking up more space than I liked and trying to find the right spool meant unburying them from the bottom of the kit. Now I can have the thread on top and more space for my fabric and paper. THANK YOU!!!
Thank you so much for this great idea! I have struggled with bobbin woes for the 40 years I've been sewing lol. This was a simple solution, I have made one for each o each of various colorways and it's a fantastic solution. Thank you for taking the time to post it.
Post a Comment