Monday, September 22, 2008

Keys to the past

key lampshade
lampshade
Originally uploaded by sassycrafter
I've always had a soft spot in my heart for this lampshade. Part of it is because I think it was a pretty cool idea to use old keys to cover a lampshade frame, but mainly it's because of my grandpa.

My Grandpa Fred was a stern man, born of German heritage and stubborn to prove it. I learned quickly that I should never interrupt him or challenge him in anyway, lest I be the unwanted recipient of The Stare. Yes, he could look at you across the dinner table in a way that made you want to disappear underneath the tablecloth and never come out again.

In some ways, I never felt that close to Grandpa Fred. I was always somewhat afraid of him. He always just seemed so angry and so different from who I felt I was. But when he and my grandma made plans to move out of their house and into an apartment, he gave me a box of keys and somehow that changed things.

I realized that maybe he and I did have something in common. We were both packrats. And apparently, the packrat gene stretched farther up the family tree--the keys originally belonged to my great-grandfather, Gustav Adolph Wahl. (Now if that isn't a good German name, I don't know what is!)

The keys sat in their rough wooden box for a few years before I dreamed up a use for them. I decided to create a chunky fringe effect around the base of a lampshade. It was great and my friends always complimented it, but then the cat knocked over the lamp and trashed the shade.

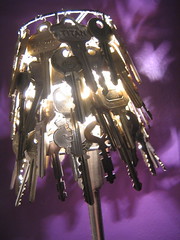
I pulled all the keys off that shade and pondered what else I could do with them that would be more sturdy. Sticking with the lampshade idea, I decided I could run a wire framework around a small lampshade and then wire the keys to the shade.

The end result was pretty striking. I just love how the shade casts interesting shadows on my bedroom wall when I turn it on each night before climbing into bed. And best of all, I think of my Grandpa Fred and say a little thank you to him for passing along his packrat gene to me. My life is so much the richer for it.

If you want a similar shade, here's how to make one:

  1. Start with a metal lampshade frame. It's best to pick one that's small yet sturdy, since the keys will add considerable weight to the finished project.
  2. Attach a piece of wire to the base of one of the vertical supports and wind it upwards around the shade. Pass it around each vertical support as you wind, to give the wire something to hold to.
  3. Dangle keys from the wire coil. Just thread a short section of wire through the top of each key and then twist them in place onto the shade. Keep adding keys to the lampshade until you're pleased with the arrangement. Put the shade on a lamp and watch the shadows dance.

Sunday, September 14, 2008

Coozie!

reversible coozie
Coozie close-up
Originally uploaded by sassycrafter
Create a snazzy coozie that folds flat to fit in your pocket while you're heading to the stadium to tailgate with your friends. Plus it's reversible, which means you can make it to match your favorite gameday outfits. It's also a great project for small fabric scraps you might have hanging around.

What you need:

+ Fabric
+ Foam
+ Thread
+ Sewing machine
+ Iron
+ Velcro

What to do:

1) Cut two pieces of fabric that are 10 inches by 4.5 inches. Also cut a 9.5-inch by 4-inch piece of something to use as insulation. I recommend a using a thin, lightweight and flexible foam from your local fabric store. If you use thicker foam, you'll need to increase the size of the fabric pieces to fit.

2) Put the two pieces of fabric right sides together and stich along the long edges and one of the short edges using a quarter-inch seam allowance. Turn right side out and press the seams using the iron. Also press in the remaining free edges one-quarter inch.

3) Slide the insulation inside the fabric rectangle and topstitch a random pattern to hold the insulation in place. Tuck in the free edges on the fourth side of the fabric rectangle and topstitch the opening closed. Sew the rough and smooth pieces of velcro to opposite ends of the coozie. Bonus tip: Use wide velcro and the coozie will fit both cans and bottles.

4) Pop open a cold one and try out your new coozie!

Interested in learning to sew? Drop me a line at sassycrafter@gmail.com. I'm planning to offer Sewing 101 classes within the year.

You can also sign up for the felting/sewing workshop I'm offering on Sunday, Oct. 4 through the UF leisure course program.

This column originally appeared in the September issue of
The Satellite.

Thursday, September 04, 2008

Felting Workshop for Gainesville Crafters

If you live in Gainesville and like to craft, check out the class I'm offering this fall through the UF Leisure Course program. Anyone can register, even if you're not a UF student.

Felted Fun: Hip Accessories from Recycled Sweaters
Saturday, Oct. 4, 2008
12 noon - 3 p.m.
Reitz Union 276 and 277

Learn how to take boring wool sweaters and turn them into one-of-a-kind accessories by using a few basic sewing skills and a technique commonly known as felting. We'll make one small project in class and you'll get pointers and inspiration for making other projects at home (purses, journal covers, iPod cozies, and others). Basic hand-sewing skills are helpful but not necessary. Materials and supplies will be provided by the instructor, in exchange for a $10 lab fee paid in cash at the beginning of class.

* Student Price: $10.00
* Alumni Price: $17.00
* Staff Price: $20.00
* General Public: $20.00
* Lab Fee: $10.00

I'm only allowing 10 students into the class, so spots are limited. Sign up now if you're interested!

Erika purse

turquoise and yellow cheerleader handbag

Cindy purse

LinkWithin

Blog Widget by LinkWithin