Sunday, November 23, 2008

Christmas Countdown

This time of year, kids can hardly wait for the man in the red suit to bring toys to all good girls and boys. One way to help kids count the days is with an Advent calendar. But why settle for an old-fashioned paper one? Make a 3-D sculpture that can hold a small surprise for every day between now and Christmas Eve!

What you need:

Tins
Paper
Pencil
Scissors
Particle board
Jigsaw
Sandpaper
Spray paint
Epoxy
Numbers

What to do:

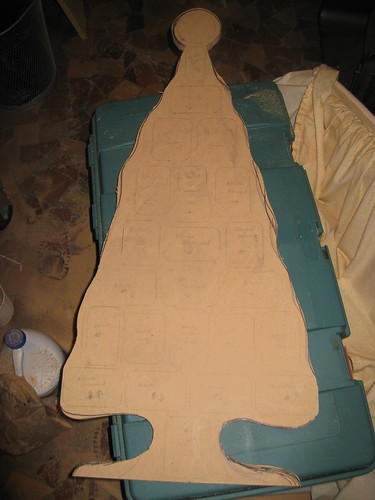
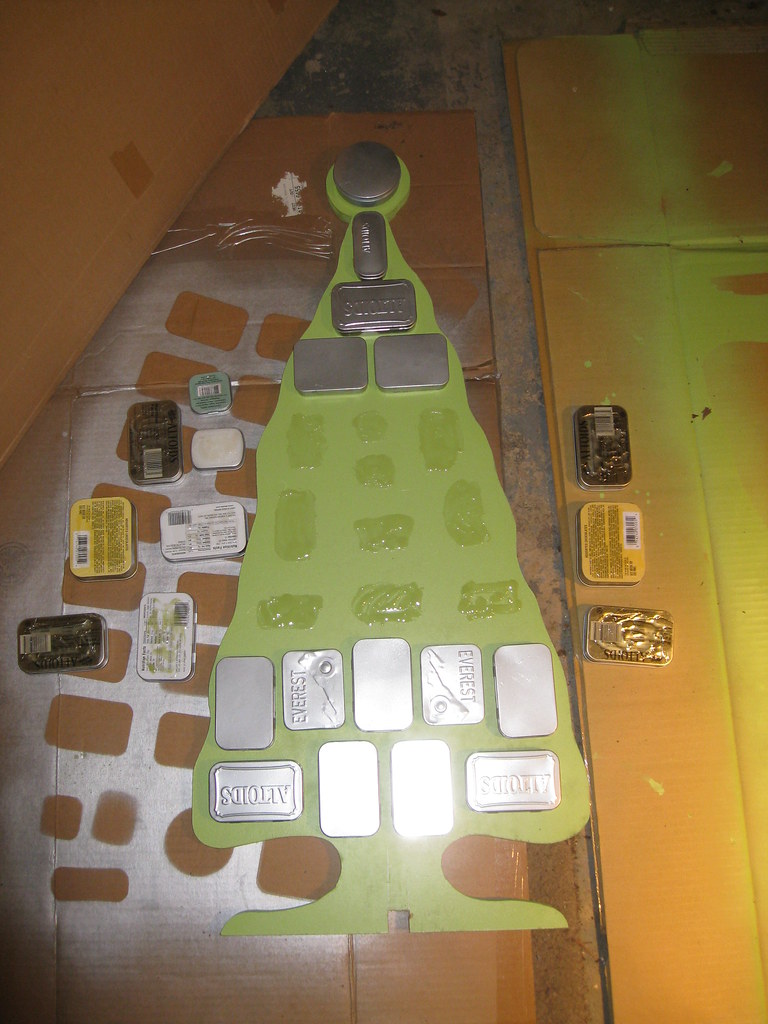
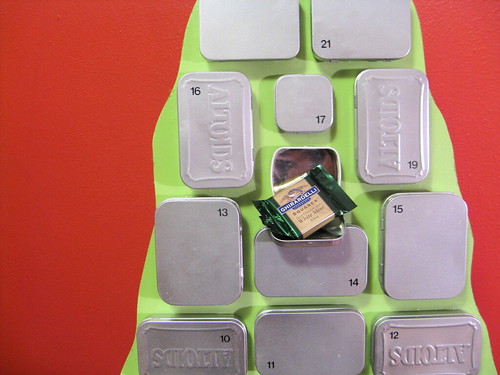
1) Dig out the candy tins that you've been collecting in your junk drawer (c'mon, you know you can't bear to throw those cute Altoids tins). Arrange 24 tins in a tree shape on a large piece of paper. Trace around the tree and around each tin. Cut out the tree pattern and use then transfer it onto the particle board. (Note: I actually did the layout directly on the MDF, but it's easier in the long run to create a pattern.)

Altoids Advent calendar -- step 1

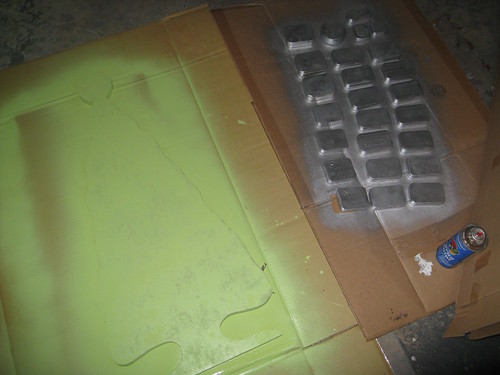
2) Cut out the tree using the jigsaw, then sand rough edges and wipe off residual dust. Spray paint the tree and the tins, adding extra coats if necessary.

Altoids Advent calendar -- step 2

Altoids Advent calendar -- step 3

3) Figure out which tin goes where by referring to your pattern, and then attach the tins to the tree with two-part epoxy. Apply number decals to the tins, add some candy or other surprises, and then count the days until Santa arrives!

Altoids Advent calendar -- step 4

Altoids Advent calendar (detail)

Don't miss unique gifts like this for sale at Gainesville's first Handmade Holiday Bazaar on December 6th at Loop de Loop (205 NE 16th Ave.)

This column will appear in the December issue of The Satellite, North Central Florida's premiere alt-monthly.

Thursday, November 20, 2008

Handmade Holiday Bazaar

Exciting news! Gainesville's first-ever Handmade Holiday Bazaar takes place the first weekend in December. It's a great way to do your holiday shopping while supporting the Gainesville arts scene. To make it even more fun and fabulous, we'll have music and food from local favorites.

x X x X x X x X x X x X x X x X x X x X x X x X x X x X x X x
What: Handmade Holiday Bazaar
When: Sunday, Dec. 7, noon to 5pm
Where: Parking lot at Loop de Loop, 205 NE Main St.
x X x X x X x X x X x X x X x X x X x X x X x X x X x X x X x

Also, we're currently looking for creative folks who make cool things and want to sell them (jewelry, handmade books, art prints, photography, clothing, accessories, furniture, woodworking, etc). Registration fee is $15 and proceeds benefit Peaceful Paths. Register by Nov. 30. It's a B.Y.O.T.T.C.H. event (bring your own table, tent, chairs, and handmade goods). Set-up begins at 10am.

Questions? Call Cat (352) 284-4672 or Kim (352) 871-0574

Please feel free to share this information with anyone you know who might be interested!

Saturday, November 08, 2008

Mosaic Magic 8-Ball

mosaic magic 8-ball
Mosaic Magic 8-Ball
Originally uploaded by sassycrafter
We've all heard the expression, "When in Rome, do as the Romans do," but there's no need to be in Rome to create your own mosaic. This tesselating art form adorned countless Roman villas and can still be used to cover any number of exposed surfaces--floors, walls, and even Magic 8-Balls.

What you need:

+ Magic 8 Ball
+ Masking tape
+ Mosaic tiles
+ Metallic marker
+ Adhesive
+ Game pieces
+ Gloves
+ Grout
+ Sponge

What to do:

1) Find a Magic 8-Ball or other object that that you want to sass up (boxes, bowling pins, and bowling balls all work). If you're using a Magic 8-Ball, cover the message window with masking tape so that it's protected from any stray adhesive in step three.

2) Use a glass cutter and running pliers to create mosaic tiles from stained glass. If you've never worked with these tools, search the Internet for tips on cutting glass, or just buy a pack of mosaic glass tiles from your local craft store.

3) Sketch a design on the Magic 8-Ball using a metallic permanent marker. Start by gluing down the non-tile elements with a strong adhesive (try Liquid Nails or another strong adhesive). Add Scrabble tiles that spell "chance," three dice to act as feet, and a colorful game piece to top things off. Then start gluing your tiles in place, starting with outlined areas and then filling in. Let the adhesive dry.

4) Cover the Scrabble tiles and dice with masking tape. Put on a pair of rubber gloves and apply sanded grout to the mosaic, taking care to press the grout firmly into all cracks. Let the grout sit the recommended time (read the grout instructions). Use a sponge to wipe the tiles with a damp sponge until the haze is gone.

5) Once the grout cures, you'll have a funky fortune-telling sculpture!

Mosaic Magic 8-Ball

Mosaic Magic 8-Ball

Thanks to Julie Charles of Crackpot Mosaics for the inspiration for this project.

This project originally appeared in the November issue of Satellite magazine.

LinkWithin

Blog Widget by LinkWithin